
Master Bread Shaping: Techniques for Perfect Loaves
The art of bread shaping is a crucial step in the process of bread-making, transforming dough into beautifully structured loaves that are both aesthetically pleasing and delicious. While the ingredients form the foundation, it’s the shaping that gives bread its character. In this article, we’ll dive into the techniques and nuances of bread shaping to help you achieve perfect loaves every time.
Understanding the Importance of Shaping
Before diving into the techniques, it’s important to understand why shaping is vital. Proper shaping contributes to the final loaf’s texture, appearance, and even flavor. It helps in creating a uniform crumb structure, ensuring even fermentation, and enhancing the bread’s rise in the oven (oven spring).
Preparing Your Dough
Successful bread shaping begins with well-prepared dough. Here are a few tips to get your dough ready for shaping:
- Proper Fermentation: Ensure the dough is adequately fermented. This usually means the dough has doubled in size and shows signs of bubbles on the surface.
- Right Consistency: The dough should be elastic and slightly tacky but not sticky. This makes it easier to handle and shape.
- Resting Period: Allow the dough to rest after dividing and before shaping. This relaxes the gluten, making the dough easier to shape.
Basic Shaping Techniques
Round Loaf (Boule)
The boule is a classic round loaf with a rustic appeal. To shape a boule:
- Lightly flour your work surface and place the dough in the center.
- Gently flatten the dough into a disk.
- Fold the edges toward the center, pressing lightly to create tension on the surface.
- Flip the dough seam-side down and use your hands to rotate it, tucking the edges under to create a tight, smooth surface.
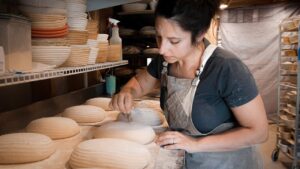
- Let the dough rest, seam-side down, in a floured proofing basket or on a floured surface.
Oval Loaf (Batard)
The batard is an elongated shape, ideal for sandwiches. Here’s how to shape it:
- Flatten the dough into a rectangle on a floured surface.
- Fold one long edge to the center, then fold the opposite edge to meet it.
- Seal the seam by pressing gently with your fingers, then fold the dough in half lengthwise, sealing the seam again.
- Roll the dough gently back and forth to elongate it, tapering the ends if desired.
- Place the dough seam-side down for proofing.
Baguette
Famous for its crispy crust and airy crumb, the baguette requires precise shaping:
- Start by flattening the dough into a rectangle.
- Fold the top third towards the center and press to seal.
- Fold the bottom third over the top and seal again, creating a tight cylinder.
- Roll the dough gently to elongate it to the desired length, tapering the ends slightly.
- Allow the shaped baguette to proof seam-side down.
Advanced Shaping Techniques
Challah
Challah is a braided bread that is both beautiful and delicious. For a classic three-strand braid:
- Divide your dough into three equal pieces and roll each into a long rope.
- Pinch the ends of the ropes together at the top and braid them by alternating the outer ropes over the center one.
- Pinch the ends together and tuck them under the loaf for a clean finish.
- Place the braided loaf on a baking sheet to proof.
Fougasse
Fougasse is a French flatbread with a distinctive leaf-like shape. To shape fougasse:
- Roll out the dough into a flat rectangle.
- Transfer to a parchment-lined baking sheet.
- Use a sharp knife or a dough cutter to make slits in the dough, creating a pattern resembling a leaf or wheat stalk.
- Gently spread the slits apart to accentuate the pattern.
- Let it proof before baking.
Tips for Perfect Shaping
- Use Light Flour Dusting: Too much flour can make it difficult to seal seams. Use just enough to prevent sticking.
- Maintain Tension: Creating surface tension is key to a good shape. Be gentle but firm when pulling and tucking the dough.
- Practice Patience: Allow the dough to rest if it’s resisting your efforts. Gluten relaxes with time, making shaping easier.
- Experiment: Every dough behaves differently. Experiment with different hydration levels and flours to find what works best for you.
Common Mistakes to Avoid
- Over-flouring: Excessive flour can prevent proper sealing of seams, leading to a misshapen loaf.
- Rushing the Process: Take your time. Rushed shaping can lead to uneven loaves that bake poorly.
- Ignoring Rest Times: Resting allows the gluten to relax, making it easier to shape the dough without tearing.
Conclusion: Embrace the Craft
Bread shaping is not just a step in the baking process—it’s an art form. It requires patience, practice, and a willingness to learn from each loaf. As you refine your techniques, remember that every loaf tells a story of its own. Embrace the craft, enjoy the journey, and let each perfect loaf be a testament to your growing expertise and passion for artisan bread baking.
Happy baking!
#ChatGPT assisted in the creation of this article.